Battery switch on travel trailer function is crucial for managing your RV’s power. Understanding how your battery switch works is key to preventing dead batteries and ensuring your appliances run smoothly. This guide will walk you through the different types of switches, troubleshooting tips, installation advice, and essential maintenance practices, empowering you to become a confident RV owner.
We’ll cover everything from basic operation to more advanced configurations, including multiple batteries and charging sources. We’ll also explore the impact of your battery switch on various systems within your travel trailer, helping you avoid common problems and maximize your RV’s efficiency and lifespan. Get ready to master your travel trailer’s power system!
Understanding Battery Switch Functionality in Travel Trailers
A battery switch is a crucial component in your travel trailer’s electrical system, allowing you to manage power from different sources and protect your batteries. Understanding how it works is essential for safe and efficient RVing. This section will explain the different types of switches, their purposes, and how to use them correctly.
Types of Battery Switches
Travel trailers typically use one of two main types of battery switches: a simple on/off switch or a more sophisticated multi-position switch. The simple on/off switch simply connects or disconnects your trailer batteries from the electrical system. The multi-position switch offers more control, allowing you to select different power sources.
Purpose of a Battery Switch in Managing Power Sources
The primary purpose of a battery switch is to manage power flow between your trailer’s batteries, shore power (hookups at campsites), and generator power. It prevents accidental draining of your house batteries when not in use and allows you to charge them from different sources. A properly functioning switch ensures that your appliances receive power from the chosen source, avoiding conflicts and potential damage to your electrical system.
Operating a Battery Switch: A Step-by-Step Guide
The operation of your battery switch will depend on its type. However, here’s a general guide:
1. Identify your switch
Locate the battery switch, usually near your batteries or inside a storage compartment.
2. Understand the positions
Familiarize yourself with the switch’s positions (e.g., “Off,” “Battery,” “Shore Power,” “Both”).
3. Start with “Off”
Always begin with the switch in the “Off” position to prevent accidental power flow.
4. Select your power source
Choose the appropriate position based on your power needs. “Battery” uses only your house batteries, “Shore Power” uses the campground’s electricity, and “Both” combines both sources (useful for charging batteries while using appliances).
So, you’re hitting the road in your travel trailer? Awesome! First things first: make sure you understand your battery switch on travel trailer function – it’s crucial for keeping your lights and appliances running. Once you’ve got that sorted, think about your entertainment. A killer audiophile travel setup can really elevate the whole experience, turning those long drives into mini-concerts.
Proper power management and great tunes – that’s the recipe for a sweet road trip!
5. Monitor your system
After switching, check your appliances to ensure they’re receiving power as expected.
Comparison of Battery Switch Types
| Feature | 1-2-Both Switch | 3-Position Switch (Off, Battery, Shore) | Other Multi-Position Switches |
|---|---|---|---|
| Number of Positions | Three (Off, Battery, Both) | Three (Off, Battery, Shore) | Varies; can include generator, combined sources, etc. |
| Simplicity | Very simple to operate | Simple to operate | Can be more complex depending on features |
| Flexibility | Limited; can’t isolate shore power from batteries | Allows charging batteries from shore power without using appliances | Offers greatest flexibility; allows for more complex power management |
| Cost | Generally less expensive | Moderately priced | Generally more expensive |
Battery Switch Installation and Wiring
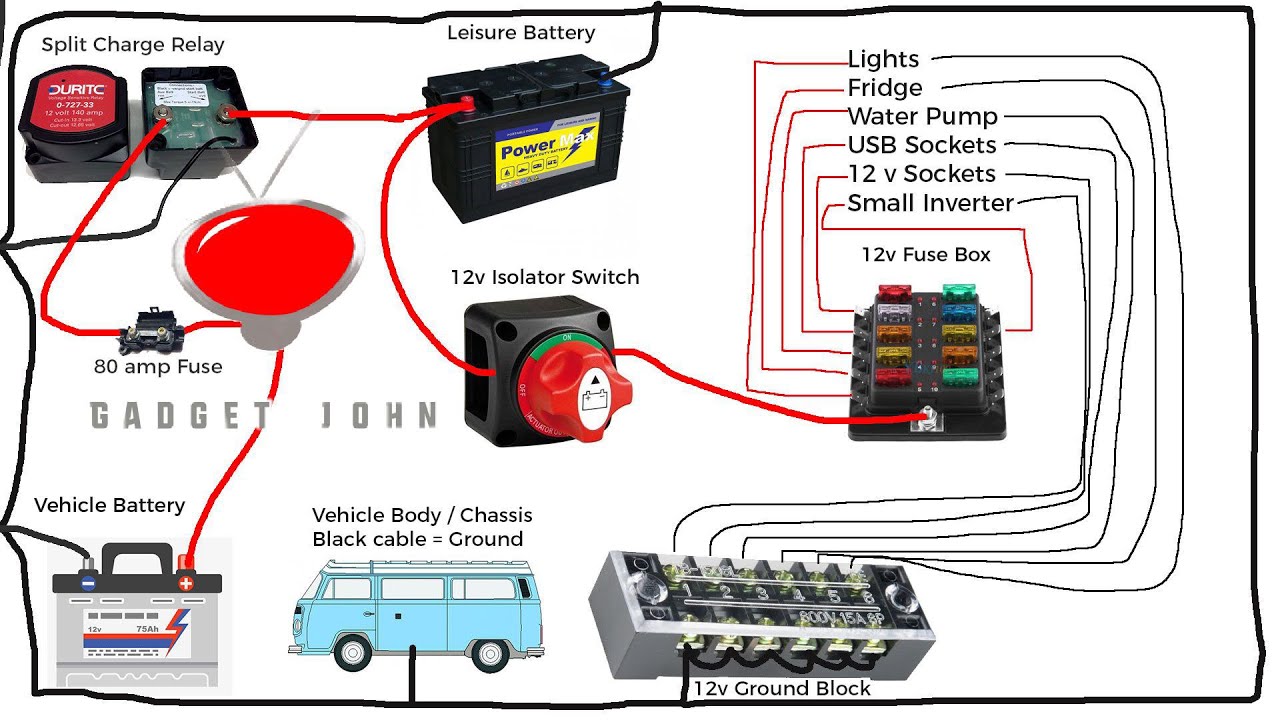
Installing a battery switch in your travel trailer is a straightforward process that significantly improves your electrical system’s management. It allows you to isolate your house batteries from the tow vehicle’s charging system, preventing unwanted battery drain and enhancing safety. This section details the installation process, covering different methods and providing clear wiring diagrams.Proper installation ensures the longevity and efficient operation of your battery switch.
A poorly installed switch can lead to electrical issues, potentially damaging your batteries or other components. Following these instructions carefully will help you avoid these problems.
Installation Methods
There are two primary methods for installing a battery switch in a travel trailer: a surface mount installation and an in-line installation. A surface mount installation is generally easier, involving mounting the switch to a convenient location within your trailer’s electrical bay or another accessible area. An in-line installation requires more precise wiring and may involve cutting existing wiring to integrate the switch.
The choice depends on your comfort level with electrical work and the specific layout of your trailer’s wiring.
Wiring Diagrams
Accurate wiring is crucial for a functional and safe battery switch installation. Below are examples of common wiring configurations.
So, you’re gearing up for a road trip? Awesome! First things first: make sure your travel trailer’s power is sorted. Understanding the function of your battery switch is key, check out this guide on battery switch on travel trailer function to avoid any dead-battery surprises. Then, to really elevate your experience, think about your entertainment.
A killer audiophile travel setup can transform a long drive into a blissful journey. Properly managing your power and sound will make your trip way more enjoyable!
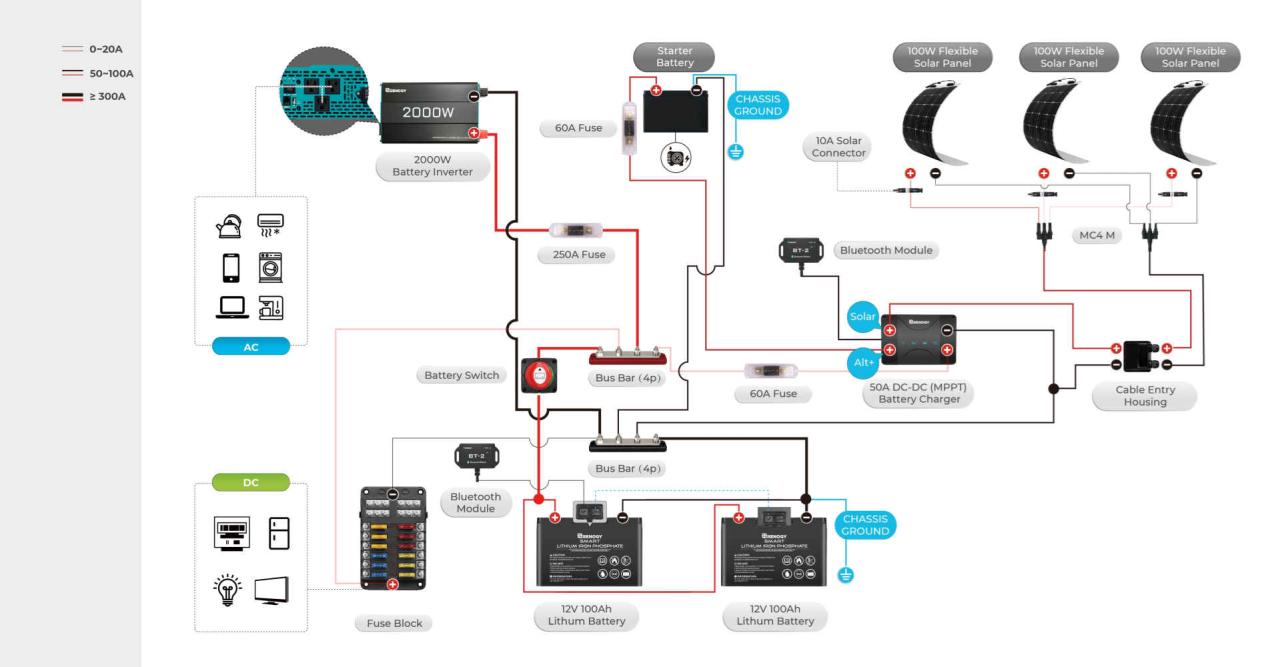
Diagram 1: Simple Two-Battery Setup
Imagine a diagram showing two batteries (Battery 1 and Battery 2) connected in parallel. A battery switch is placed in the positive (+) wire connecting the two batteries to the main power distribution panel. The negative (-) terminals of both batteries are connected directly to the chassis. The switch’s positive (+) output wire connects to the positive (+) bus bar of the main distribution panel.
The switch’s negative (-) terminal is connected to the negative (-) bus bar or ground point. This setup allows you to switch both batteries on or off simultaneously.
Diagram 2: More Complex Setup with Charger and Inverter
This diagram shows a more complex setup. It includes two batteries (Battery 1 and Battery 2), a battery charger, an inverter, and a battery switch. The battery switch is positioned in the positive (+) wire leading from the batteries to the rest of the electrical system. The charger connects directly to the batteries, bypassing the switch. The inverter is wired to the load side of the switch.
This configuration allows for charging the batteries even when the switch is off, while still providing control over power to the house system.
Necessary Tools and Materials
Before starting, gather the necessary tools and materials. This ensures a smooth and efficient installation.
- Battery switch (choose the appropriate amperage rating)
- Battery cables (sufficient gauge for your system)
- Crimping tool
- Wire strippers/cutters
- Screwdriver (appropriate size for your switch and mounting hardware)
- Electrical tape
- Fuse holder and fuse (appropriate amperage)
- Wire connectors
- Mounting hardware (screws, bolts, etc.)
- Multimeter (for testing)
Connecting the Battery Switch
The exact procedure will vary slightly depending on your specific setup and the type of battery switch you’ve chosen. However, the general steps remain the same. Always disconnect the negative (-) terminal from your batteries before beginning any work.
- Mount the switch: Securely mount the switch in a chosen location, ensuring easy access.
- Connect the positive (+) wires: Connect the positive (+) cables from your batteries to the input terminals of the switch, ensuring secure connections and proper crimping.
- Connect the output wire: Connect the output wire from the switch to the positive (+) bus bar of your electrical panel. Ensure the correct polarity.
- Connect the negative (-) wires: Connect the negative (-) terminals of your batteries directly to the chassis ground. This should be done prior to connecting the positive wires.
- Install a fuse: Install an appropriately rated fuse in the positive (+) line after the battery switch to protect your circuit.
- Test the installation: After completing the connections, carefully test the system with a multimeter to ensure proper voltage and functionality.
Battery Switch and its Impact on Various Travel Trailer Systems
Your battery switch is the central nervous system of your travel trailer’s power, controlling the flow of electricity from your batteries to your appliances. Understanding its impact on different systems is key to safe and efficient RVing. A simple flick of the switch can mean the difference between a fully functioning camper and a dark, silent one.
The battery switch’s position directly influences which power source feeds your appliances. In the “off” position, all power to the trailer systems is cut, preventing accidental drain on your batteries. The “battery” position connects only your house batteries, powering appliances independently of shore power. The “both” position combines both shore power and your house batteries, providing redundancy and extending your off-grid capabilities.
Understanding these positions is critical to managing your power resources.
Power Consumption Differences Based on Battery Switch Position
The power consumption of your travel trailer’s systems varies considerably depending on the battery switch position. When only the house batteries are engaged (“battery” position), you’re entirely reliant on their stored energy. This means higher-draw appliances like air conditioners and microwaves might strain your batteries quickly, leading to a dead battery if used for extended periods. In the “both” position, shore power takes the primary load, conserving your battery power for nighttime or situations where shore power isn’t available.
Lights, for example, will draw power primarily from shore power in the “both” position, extending battery life. A water pump, while relatively low-draw, will still consume battery power in the “battery” position, whereas in the “both” position, it might draw from shore power if your converter is properly configured.
Impact of a Faulty Battery Switch on Travel Trailer Systems
A malfunctioning battery switch can cause several problems. A switch stuck in the “on” position could drain your batteries completely even when not using the trailer, potentially leaving you stranded. Conversely, a switch stuck in the “off” position renders all battery-powered systems unusable, including essential safety features like carbon monoxide detectors. A faulty switch can also lead to unexpected voltage drops, potentially damaging sensitive electronics.
In some cases, a faulty switch might even create a short circuit, resulting in a fire hazard. Regular inspection and maintenance of your battery switch are essential.
Scenarios Highlighting the Importance of a Properly Functioning Battery Switch
Imagine this: you’re boondocking (camping without hookups) and rely solely on your house batteries. A properly functioning battery switch ensures your lights and water pump work correctly. If the switch malfunctions, you’ll be left in the dark and without running water. Another scenario: you’re connected to shore power, but a faulty switch prevents the batteries from charging, leaving you with insufficient power once you disconnect from shore power.
A properly functioning switch is critical for safe and comfortable travel trailer operation, especially in remote locations.
Different Battery Switch Configurations and Their Applications
Choosing the right battery switch for your travel trailer depends heavily on your power needs and setup. A simple system might suffice for basic needs, while a more complex configuration is necessary for those with multiple batteries, solar panels, and other power sources. Understanding the different options is key to ensuring reliable and safe power management.
Let’s explore various battery switch configurations and their best applications. We’ll compare simple switches, battery disconnect switches, and battery combiners, highlighting their differences and uses in various travel trailer setups.
Simple Battery Switch Functionality, Battery switch on travel trailer function
A basic battery switch is a simple on/off switch that connects or disconnects your house battery from the trailer’s electrical system. This allows you to easily isolate the battery when not in use, preventing accidental drain. These switches are usually inexpensive and easy to install, making them suitable for trailers with a single battery and minimal power demands.
They typically offer only two positions: “On” (connecting the battery to the trailer’s system) and “Off” (completely disconnecting the battery).
Multiple Battery and Charging Source Systems
More sophisticated systems incorporate multiple batteries (e.g., a deep-cycle house battery and a starting battery) and multiple charging sources (e.g., shore power, alternator, and solar panels). These systems often use more complex switches or battery management systems (BMS) to manage charging and power distribution efficiently. These systems may include features like automatic charging prioritization, preventing overcharging, and ensuring the correct battery is used for starting versus house power.
A typical setup might involve a switch to select which battery is supplying power to the trailer and separate charging circuits for each battery.
Battery Disconnect Switch Operation and Importance
A battery disconnect switch is a critical safety feature. It allows you to completely isolate the battery from the trailer’s electrical system, preventing accidental drain and potential fire hazards. This is particularly important for long-term storage when you’re not using the trailer. Simply flipping the switch to the “off” position cuts all power to the battery, effectively shutting down all 12V systems in the trailer.
This switch is distinct from a simple battery switch because it provides a complete electrical isolation for safety.
Battery Combiner vs. Standard Battery Switch
A battery combiner is fundamentally different from a standard battery switch. While a switch simply connects or disconnects a battery, a combiner allows multiple batteries to work together, effectively increasing the total power capacity. They usually allow the batteries to be charged independently but then combine them to provide more power when needed. This is particularly useful for trailers with larger power demands or those using multiple batteries for extended off-grid use.
Unlike a simple switch that isolates a battery completely, a combiner manages the flow of power between batteries, ensuring both are charged and can provide power to the system as needed. Many combiners also include safety features like over-current protection.
Comparison of Battery Switch Configurations
| Configuration | Number of Batteries | Charging Sources | Suitability |
|---|---|---|---|
| Simple Battery Switch | 1 | Shore Power | Small trailers with minimal power needs |
| Multiple Battery System with Switch | 2+ | Shore Power, Alternator | Mid-sized trailers with moderate power needs |
| Battery Combiner with Multiple Charging Sources | 2+ | Shore Power, Alternator, Solar | Large trailers with high power demands, extended off-grid use |
| Advanced BMS with Multiple Batteries and Sources | 2+ | Shore Power, Alternator, Solar, Generator | Luxury trailers with complex power systems and automation |
Mastering your travel trailer’s battery switch is a significant step toward confident and problem-free RVing. By understanding its function, troubleshooting potential issues, and performing regular maintenance, you’ll ensure a reliable power supply for all your adventures. Remember, a well-maintained battery switch is a key component of a safe and enjoyable RV experience. So, get out there and explore!
FAQ Overview: Battery Switch On Travel Trailer Function
What happens if my battery switch is left in the “off” position?
Leaving the switch off completely disconnects your house batteries from the rest of the RV’s electrical system, preventing any drain, even if something is accidentally left on.
How often should I inspect my battery switch for corrosion?
Inspect your battery switch at least twice a year, or more frequently if you live in a humid climate or store your RV outdoors.
Can I use a battery switch with different battery types (e.g., lead-acid and lithium)?
Generally, no. Using a standard battery switch with different battery chemistries isn’t recommended. Consult a qualified electrician or RV technician for advice on proper setup.
My battery switch seems stuck. What should I do?
Try lubricating the switch mechanism with a penetrating lubricant. If it remains stuck, consult a professional for repair or replacement.
